Chapter 1 - Recommendations Based on Thermal Imaging
Chapter 1 - Recommendations Based on Thermal Imaging
People depend on vision for 90% of their sensory information and this is true whether watching a TV show or managing a poultry house. When inspecting a poultry house, growers typically look to see that the drinkers are at the proper height and not leaking; the litter is in good shape; the feeders are at the proper height and filling properly; and that chick behavior indicates that they are comfortable (see Figures 1.8 and 1.9). If the chicks are stressed, it is not always possible to see the source of the problem since we can’t see temperature. While a few thermometers strategically placed in a house give an indication of the temperatures at those points, you still don’t get the full picture of the overall thermal environment within the house. This is where thermal imaging comes into play.
Figure 1.8 - Typical chick behavior under whole house brooding
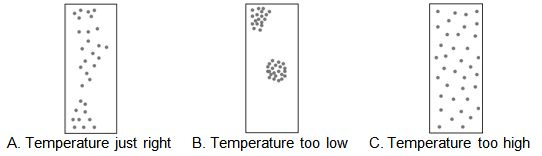
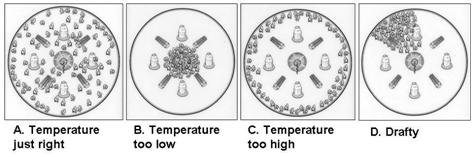
Figure 1.9 - Typical chick behavior under spot brooding
Thermal imaging cameras record different colors for different temperatures. All objects that are warmer than absolute zero emit infrared light/heat that is invisible to the human eye. Infrared cameras measure the amount of “invisible” energy emitted and converts it to a temperature. Software within the camera then converts the temperatures to a color so you end up with a picture where each color represents a specific temperature.
As part of the PHES, thermal images were taken of various locations in the poultry house with chickens in place. These images were used to identify areas of the house where heat is being lost. For example, thermal images of walls and ceiling can be used to identify areas of poor insulation or air leakage and thermal images of walls, ceiling, and other surfaces show possible air leaks, areas in need of insulation, and warm/cold areas on the floor.
Insulation is any material that reduces the heat transfer from a place to another. Usually, the materials used as insulation present a high resistance to heat flow. This insulation resistance is quantified by an “R-value.” Well insulated components have higher R-values and lower heat flow through the material than poorly insulated components. As a general reference, R-values for poultry houses could be described as follows:
| R = less than 2 | Very Low R-value |
| R = 2 to 5 | Low R-value |
| R = 6 to 9 | Moderate R-value |
| R = 10 to 15 | High R – value |
| R = 16 or more | Very High R-value |
Some quick facts about R-value are:
- One type of insulation maybe thicker or thinner than another, but if the R-value is the same they should insulate equally.
- R-value performance testing is done in a 70°F environment with no air movement. Ironically enough, when you need insulation the most you're generally not in these ideal temperatures or conditions. This can result in the actual effective R-value being lower than the rated R-value.
- The R-value of insulation is substantially lowered when there are any air or water/moisture leaks.
- The standard R-value required for poultry house insulation Varies based on climate and temperature.
Based on the thermal images taken at all the poultry houses, the following common areas for improvement were identified:
- Insulate the attic
- Insulate and cover the sidewall curtain opening
- Re-insulate the sidewall below the curtain opening
- Seal cracks
- between the bottom of the sidewall and the top of the concrete foundation wall
- along the ceiling line at the ends of the barn
- around end wall doors
- Cover and seal tunnel curtain inlets (commercial tunnel inlet doors is one option)
A selection of insulation materials is available. All of these are based on standard principles of thermal insulation. Materials used to reduce heat transfer by conduction, radiation, or convection is employed in varying combinations to achieve the desired outcome (usually thermal comfort with low energy consumption). Usually a combination of materials is required to achieve an optimum solution for a poultry house over a range of climatic conditions. There are also some products which combine different types of insulation in one product.
The choice and degree of insulation is based on a number of factors:
- Prevailing climate
- Ease of installation (e.g. some materials cannot be retrofitted due to issues of accessibility or toxicity)
- Durability – resistance to compression, moisture, degradation
- Cost – which is generally related to durability and effectiveness
- The mode of heat transfer – bulk insulators are most useful in cold conditions where significant convective / conductive losses occur; they are less useful in hot conditions where solar radiation is the source of heat gain
- The orientation of the surface and direction of heat flow determine how effective a radiant barrier will be – radiant barriers work best at stopping downward heat transfer from or to horizontal surfaces
- Toxic effects / Off gassing
- Environmental impact and sustainability
A range of material can be employed in the manufacture and construction of insulation products:
- Synthetic polymers e.g. polystyrene, polyicynene, polyurethane, polyisocyanurate
- Aerogel
- Mineral wools (insulation) - e.g. Fiber-glass, rockwool, slagwool
- Minerals - Vermiculite, Perlite
- Natural plant materials - Cellulose insulation, cork, hemp, cotton, straw
- Animal fibers - wool
Other unusual materials or of historic interest:
- Natural plant materials – corn cobs, sawdust, wood chips, sawdust, redwood bark, hemlock fiber, or balsa wood
Insulation can be installed in a number of forms:
- Non-structural
- Batts (insulation) - e.g. fiber-glass, mineral wool
- Blankets (insulation)
- Loose-fill (insulation) e.g. cellulose (may also be wet-sprayed), vermiculite
- Spray foams (insulation) e.g. synthetic polymers
- Reflective Insulation (insulation) e.g. foil-foam-foil
- Structural
- Rigid Panels (insulation)
- Structured panels (insulation)
- Straw bale
Attic insulation
 Having quality ceiling insulation is of significant benefit to poultry producers year round. During cold weather, hot air produced by the brooders, furnaces and the chickens quickly rises towards the ceiling. If the ceiling is not properly insulated this valuable heat will pass through it, resulting in lower house temperatures and higher heating costs. Conversely, during summertime ceiling insulation keeps the amount of heat entering the house through the ceiling to a minimum.
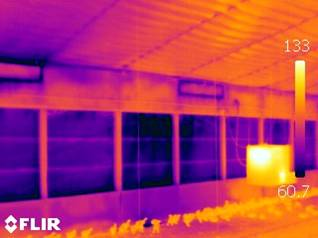
On a hot summer day, attic temperatures in dropped-ceiling houses can easily exceed 130°F. If a ceiling is not properly insulated, heat from the attic space will enter the house, leading to higher house temperatures and lower bird performance. A minimum R-value of ceiling insulation is R-12, while R-19 is preferred Attic insulation should be checked yearly to verify a sufficient level and proper distribution of insulating material.
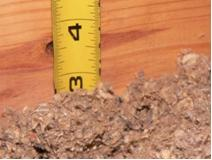
The most common form of insulation used in dropped ceilings is blown-in cellulose, which settles and shifts over time. A poultry house built in the 1980s probably had 5-6 inches of insulation when new but by 2008 this same house often has less than two inches of insulation due to settlement and compaction (see Figure 1.11). The area around ceiling fans (see Figure 1.12) is particularly prone to compaction caused by the pulsing on and off of the fan.
Attic insulation should be checked yearly to identify any areas damaged by rodents or water leaks (see Figure 1.13) and corrective measures taken as needed.
Figure 1.11 - Thermal image of a ceiling showing missing insulation. The insulation has shifted off center of the ceiling leaving cold areas.
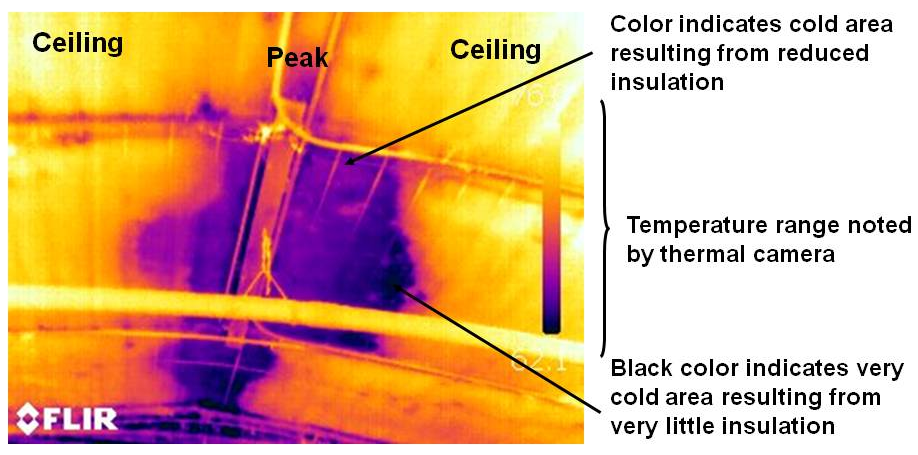
Figure 1.12 - Thermal image showing missing insulation around a ceiling fan.
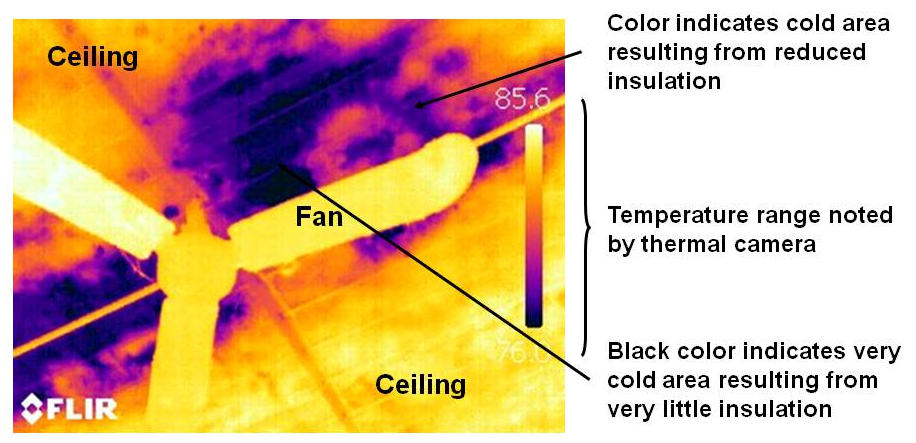
Figure 1.13 - Thermal image showing damaged ceiling insulation caused by roof leaks.
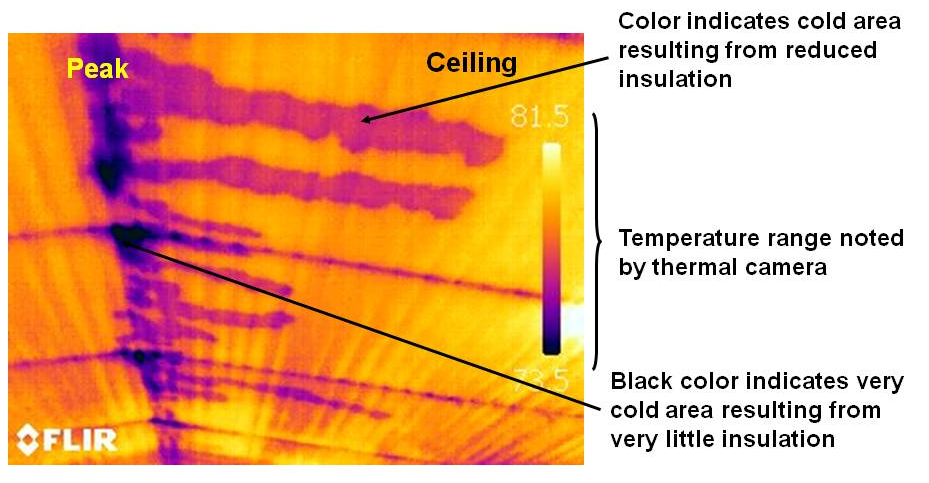
Cellulose insulation was introduced into the poultry house market in the mid-1970s. When installed properly, it does a relatively good job. In the late 1990s, most of the poultry companies started requiring tunnel ventilation which meant the houses had to be much tighter. The result was much more vibration on the ceilings. This can result in the cellulose shifting out of the peak and sliding down the truss. It can also cause the cellulose to settle much more than it had in previous years.
In the winter, air cools as it moves toward the outside, and moisture condenses in the walls and attic. This makes the insulation wet, causing it to get heavy and compress, which in turn reduces the effectiveness of the insulation. This moisture will also eventually cause structural problems. Unless you have a vapor barrier, the recommendation is that you do not use fiberglass, mineral wool, and cellulose insulation.
To minimize the impact of high winds blowing ceiling insulation away from the side walls, eave openings should be no more than one inch high. Do not totally close off the eaves, however, because fresh air is needed to help remove moisture from the attic space as well as help minimize attic temperatures during hot weather.
Blown-in cellulose type insulation has an average R-value of 3.2 per inch. To obtain the suggested R-19, a minimum of 6 inches is required. Most of the houses evaluated as part of the PHES had only 2-4 inches of insulation, which is insufficient for controlling temperature loss in the winter and temperature increase in summer. Adding insulation can save 300 to 600 gal LP/house/year. The payback for this investment is 2.5 to 5 years.
There are steps that can be taken when installing blown-in cellulose insulation that will help to minimize the shifting of insulation from the peak of the house. Before blowing the insulation, install a four-foot swath of 3½ inch fiberglass batt at the peak of the ceiling. Cellulose insulation is then blown on top of the fiberglass batt, minimizing the possibility that the peak of the ceiling will be left uninsulated. An additional intervention can be the installation of 1 inch x 4 inch insulation stops between the lower cords of the trusses before blowing in the cellulose. The insulation stops act as dams keeping the insulation from sliding toward the side walls and away from the peak.
Other ceiling insulation can be batt or blanket insulation, which is installed in different thicknesses. A 3½- to 4-inch batt of fiberglass has an R-value of approximately 11 and a 6-inch batt of fiberglass has an R-value of approximately 19.
Insulation of side and end walls
There can be 6,000 to 8,000 square feet of side and end wall area in a typical commercial broiler house. Each square foot of uninsulated wall has the potential to transfer a large amount of heat energy to the cold outside. How fast heat is lost through a wall will depend on its R-value as well as how big a temperature difference there is between the inside and outside.
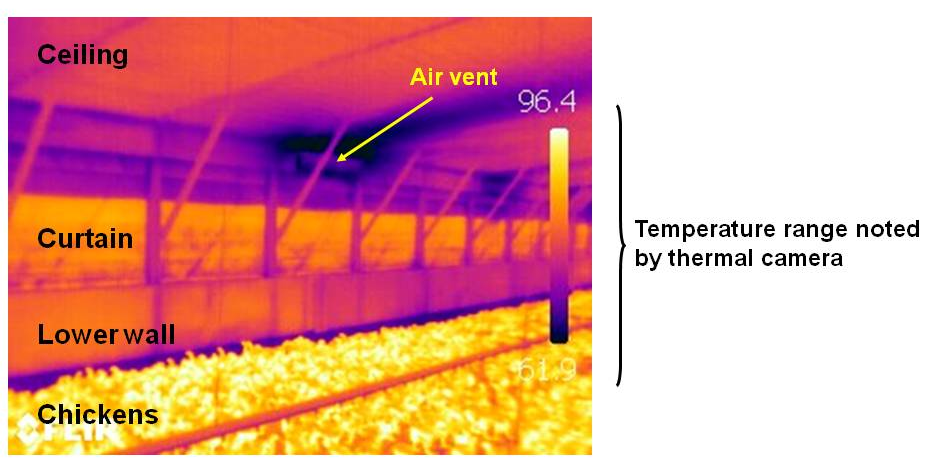
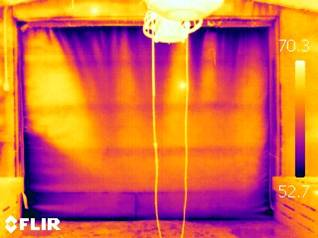
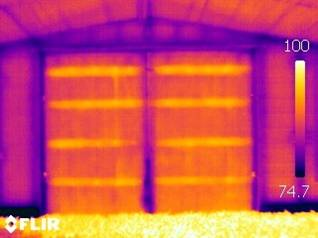
Figure 1.15 is a thermal image of an uninsulated sidewall curtain. There is no insulation of the curtains in this house and the color detected by the thermal camera indicates cold areas of the walls. The lower wall also shows indications of insulation settling out. By comparison, Figure 1.16 is a thermal image of an insulated sidewall. Bubble wrap was placed behind the curtain. The yellow color for the sidewall curtains indicates good insulation. The black color around the air vent indicates cold air is coming in.
Figure 1.15 - Thermal image of an uninsulated sidewall curtain
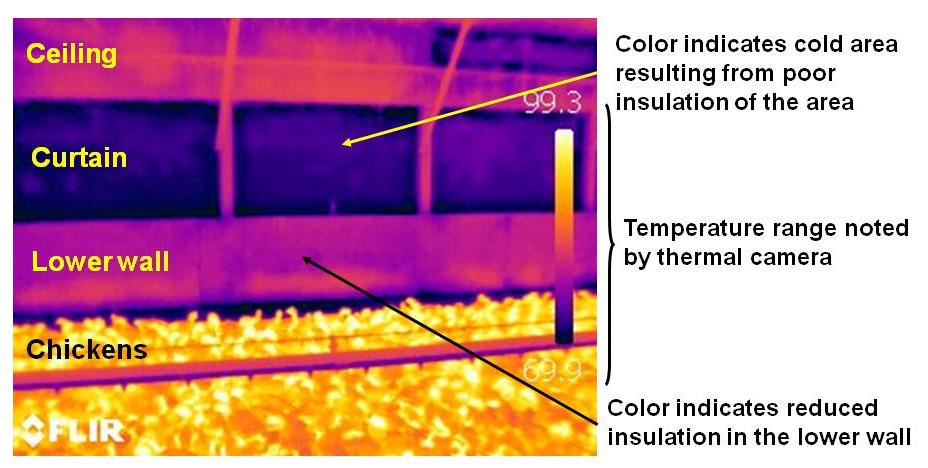
Figure 1.16 - Thermal image of a sidewall curtain insulated with bubble wrap
Insulation of broiler houses should provide a minimum thermal resistance (R-value) of R-8 in exposed walls. It is recommended that the sidewall curtains be closed and insulated. These modifications could save 600 – 1,000 gal LP/house/year, with a payback of two to four years.
The R-value of most insulation materials decreases drastically when moistened. Installing a vapor barrier on the insulation's warm side protects against moisture saturation. Seal tears and damage to exposed vapor barriers.
Many different types of wall construction are used in broiler houses. Some of the older houses use board-type insulation underneath the tin, but the modern trend is to build a wall that is approximately 3½ inches thick, which is insulated with batt-type insulation.
Endwalls are often insulated with fiberglass batts, and in some cases with board-type insulation. Common board-type insulation can be either polyurethane or polystyrene. Polystyrene R-values range from 3 to 5 per inch of thickness. Polyurethane has an average R-value of 6 per inch of thickness. Figure 1.17 shows thermal images comparing sealed and leaky end doors.
Figure 1.17 - Thermal images of leaky and well-sealed end doors.
A. Leaky door
B. Sealed door
In retrofitting or redoing an older house, board-type insulation can be extremely helpful in keeping up the R-value when trying to modernize a poultry house. Board-type insulation is often the only type of insulation available for insulating high ceiling or open-truss houses. It is particularly valuable in insulating end doors. One of the disadvantages of using board-type insulation in broiler houses is that it is often worked on by rats, darkling beetles, wild birds, and other varmints, and over a period of time may not hold up as well as batt or blown-in insulation.
The use of solid side walls is another option. In general, a solid sidewall house will use less energy than a curtain-sided house. Comparing the fuel requirement during cold weather for an old 5-foot curtain-sided house to a solid sidewall house, it is possible save as much as 40% on the fuel in the solid sidewall house. Similarly, comparing a solid sidewall house to a curtain house with 24-inch curtain openings, curtain flaps and insulation above and below the curtains, only a 15% fuel savings may be realized.
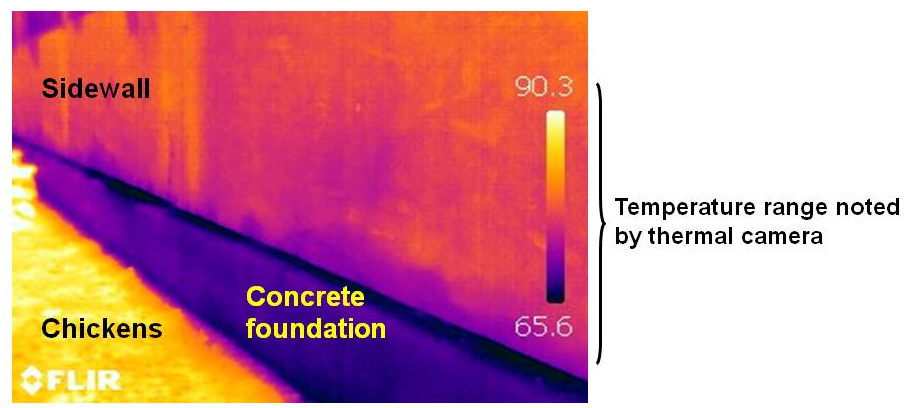
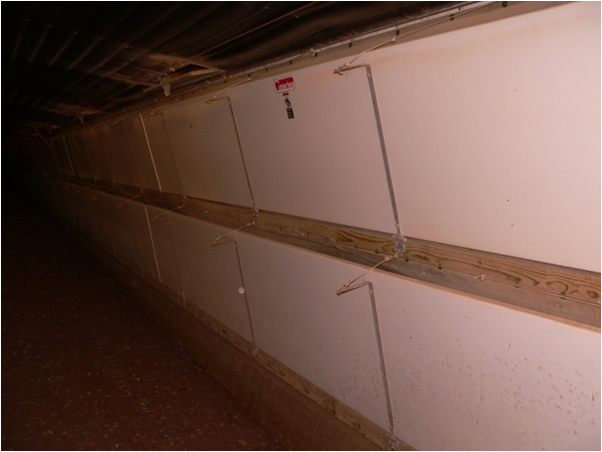
Just because a broiler house has solid side walls does not mean that it is air tight (see Figure 1.18), which is a requirement for most ventilation systems. All carpentry joints must be sealed, either with regular caulk, expanding foam, or foam tape.
Figure 1.18 - Thermal image of a solid sidewall above a concrete foundation.
Options for totally enclosing a curtain-sided house included:
- In a traditional stud-wall house: Place metal sheeting on the outside; fill the wall with fiberglass batt insulation; install an interior vapor barrier; then cover the interior with plywood. Estimated cost: $10,000+
- Close up curtain openings using lumber or polystyrene board insulation and sheet metal siding. Estimated cost: $5,000 - $10,000
- Spray polyurethane insulation. Estimated cost: $1.00+ per square foot
- Heavy duty polypropylene-faced fiberglass batt insulation in 50-foot long rolls. Therm-All is the most commonly used form of this insulation product. Therm-All[1] consists of a 1.5 mill black polypropylene facing reinforced with tri-directional fiberglass/polyester scrim with a 0.5 metalized polyester film backing for added strength and to act as a radiant barrier. Attached to the metalized polyester film is a 3½ inch fiberglass batt this is specifically designed to recover its original thickness after it is unrolled.
Insulating tunnel inlets
One of the challenges facing many poultry growers during cold weather is keeping the tunnel curtain ends of their houses warm and dry. There are a number of reasons for this:
- Tunnel inlets are loose end wall doors
- The tunnel curtain is often larger than the remainder of the side wall curtains (5 feet high for tunnel curtains versus 3 feet high for side wall curtains). Since curtains have a very low insulation value (R-value around 1.5) this two foot difference in height can result in the brooders/furnaces having to run 30% more than those in the remainder of the house.
- The tunnel curtain has to be free to open and close as needed so it is often looser than the remainder of the side wall curtains in the poultry house. Air leaking from around the tunnel curtain can further increase heating costs.
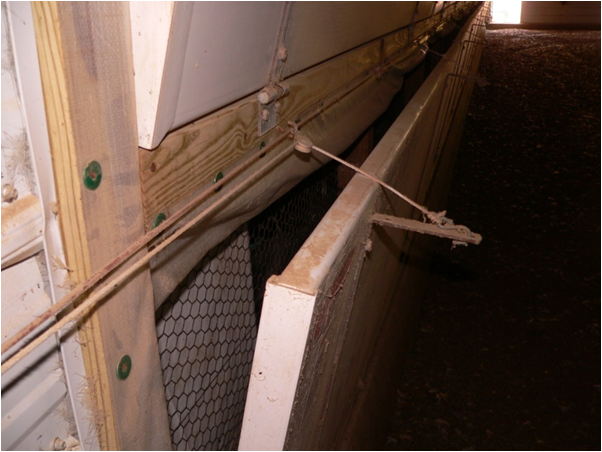
Figure 1.19 compares thermal images for uninsulated and well insulated tunnel doors. Figure 1.20 has two views of a commercial tunnel inlet door. Insulating tunnel inlets can save 400-600 gal LP/house/year and have a payback period of 5-8 years.
Figure 1.19 - Thermal images comparing leaky versus well insulated tunnel inlets
A. Tunnel inlet leakage
B. Well insulated tunnel doors
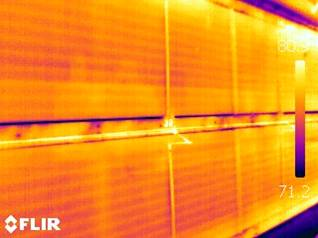
Figure 1.20 - Commercial tunnel inlet doors
Additional problems identified with thermal images
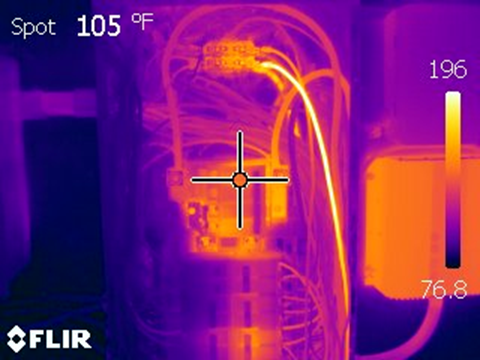
Thermal imaging can also be used to identify and electrical problems. For example, Figure 1.21 shows overheating in a breaker due to a poor contact. Similarly, Figure 1.22 shows overheating in a relay due to a poor connection.
Figure 1.21 - Thermal image showing overheating due to a problem with a breaker contract.

Figure 1.22 - Thermal image showing overheating due to a poor relay connection.
[1]Trade and brand names are used for information only and do not imply approval of any product to the exclusion of others that may also be suitable
